网络数据包的捕获、过滤和分析(Packet Capturing)

摘要

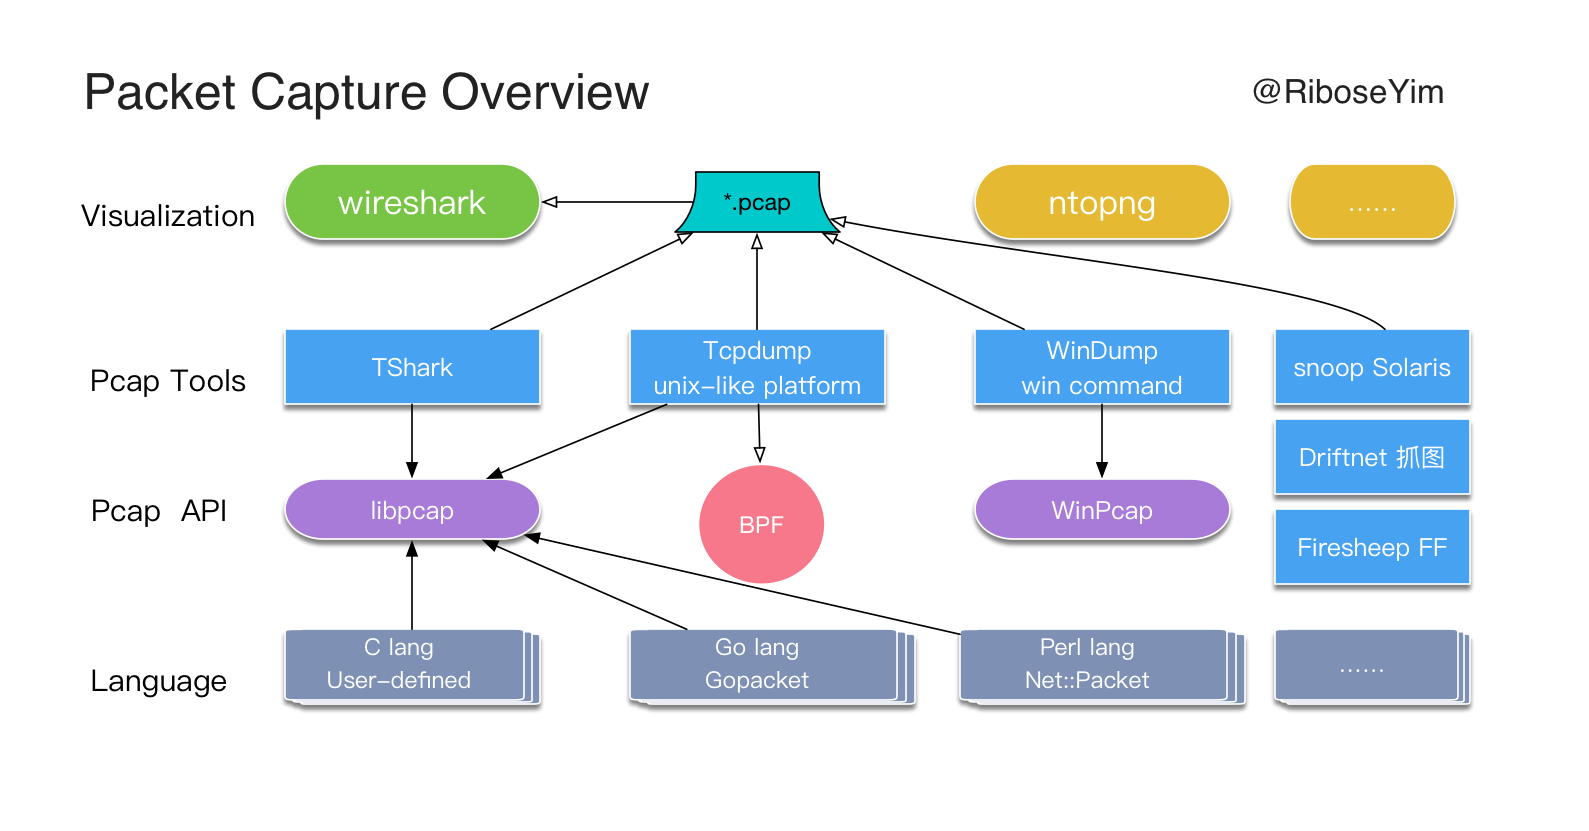
  • Packet Capturing Overview
  • What is Packet Capturing
  • How can it be used
  • What is libpcap
  • Debug Tools: tcpdump & WinPcap & snoop
  • What is BPF
  • What is gopacket

What is Packet Capturing

Packet capture is a computer networking term for intercepting a data packet that is crossing or moving over a specific computer network.Once a packet is captured, it is stored temporarily so that it can be analyzed. The packet is inspected to help diagnose and solve network problems and determine whether network security policies are being followed.

Packet Capture Overview

How can it be used

  • Development
    Testing & validating & Reverse engineer APP on API

  • Network Administration
    Seeing what traffic goes on in background,Looking for malicious traffic on networkData capturing is used to identify security flaws and breaches by determining the point of intrusion.

  • Troubleshooting
    Managed through data capturing, troubleshooting detects the occurrence of undesired events over a network and helps solve them. If the network administrator has full access to a network resource, he can access it remotely and troubleshoot any issues.

  • Security
    defcon Wall of Sheep.Hackers can also use packet capturing techniques to steal data that is being transmitted over a network, like Stealing credentials.When data is stolen, the network administrator can retrieve the stolen or lost information easily using data capturing techniques.

  • Forensics
    forensics for crime investigations.Whenever viruses, worms or other intrusions are detected in computers, the network administrator determines the extent of the problem. After initial analysis, she may block some segments and network traffic in order to save historical information and network data.
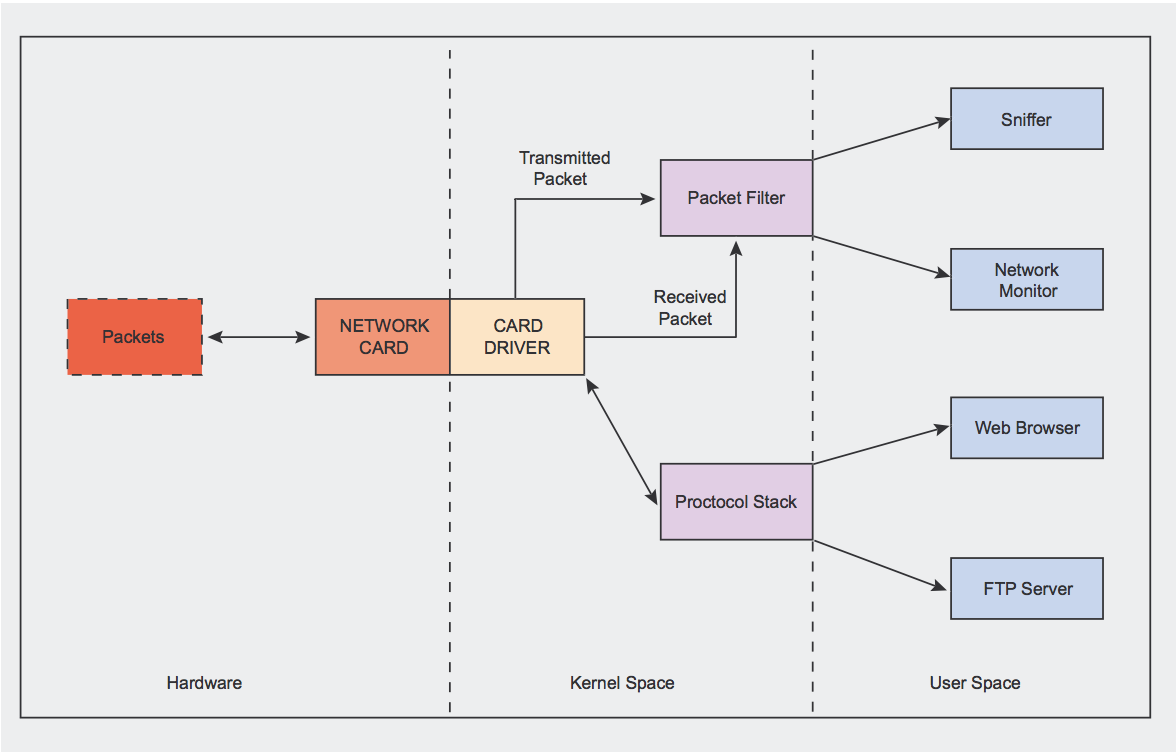
What is libpcap

libpcap flow involving data copy from kernel to user space.

1
2
3
4
5
6
7
8
9
10
11
12
13
14
15
16
17
//Compile with: gcc find_device.c -lpcap
#include <stdio.h>
#include <pcap.h>

int main(int argc, char \*\*argv) {
char \*device;
char error_buffer[PCAP_ERRBUF_SIZE];
//Find a device
device = pcap_lookupdev(error_buffer);
if (device == NULL) {
printf("Error finding device: %s\n", error_buffer);
return 1;
}

printf("Network device found: %s\n", device);
return 0;
}
1
2
3
4
5
6
7
8
9
10
11
12
13
14
15
16
17
18
19
20
21
22
23
24
25
26
27
28
29
30
31
32
33
34
35
36
37
38
39
40
41
42
43
44
45
46
47
48
49
#include <stdio.h>
#include <time.h>
#include <pcap.h>
#include <netinet/in.h>
#include <netinet/if_ether.h>

void print_packet_info(const u_char \*packet, struct pcap_pkthdr packet_header);

int main(int argc, char \*argv[]) {
char \*device;
char error_buffer[PCAP_ERRBUF_SIZE];
pcap_t *handle;
const u_char *packet;
struct pcap_pkthdr packet_header;
int packet_count_limit = 1;
int timeout_limit = 10000; /*In milliseconds*/

device = pcap_lookupdev(error_buffer);
if (device == NULL) {
printf("Error finding device: %s\n", error_buffer);
return 1;
}

/*Open device for live capture*/
handle = pcap_open_live(
device,
BUFSIZ,
packet_count_limit,
timeout_limit,
error_buffer
);

/*Attempt to capture one packet. If there is no network traffic
and the timeout is reached, it will return NULL*/
packet = pcap_next(handle, &packet_header);
if (packet == NULL) {
printf("No packet found.\n");
return 2;
}

/*Our function to output some info*/
print_packet_info(packet, packet_header);
return 0;
}

void print_packet_info(const u_char \*packet, struct pcap_pkthdr packet_header) {
printf("Packet capture length: %d\n", packet_header.caplen);
printf("Packet total length %d\n", packet_header.len);
}

Debug Tools

1
2
3
4
5
#Older versions of tcpdump truncate packets to 68 or 96 bytes.
#If this is the case, use -s to capture full-sized packets:
$ tcpdump -i <interface> -s 65535 -w <some-file>
# A packet capturing tool similar to TcpDump for Solaris
$ snoop -r -o arp11.snoop -q -d nxge0 -c 150000

tcpdump

tcpdump 是一个运行在命令行下的嗅探工具。它允许用户拦截和显示发送或收到过网络连接到该计算机的TCP/IP和其他数据包。它支持针对网络层、协议、主机、网络或端口的过滤,并提供and、or、not等逻辑语句来帮助你去掉无用的信息,从而使用户能够进一步找出问题的根源。可以使用 BPF 来限制tcpdump产生的数据包数量。

snoop

snoop uses both the network packet filter and streams buffer modules to provide efficient capture of packets from the network. Captured packets can be displayed as they are received, or saved to a file for later inspection.

promiscuous mode

抓包工具需要工作在promiscuous mode(混杂模式)(superuser), 指一台机器的网卡能够接收所有经过它的数据流,而不论其目的地址是否是它。当网卡工作在混杂模式下时,网卡将来自接口的所有数据都捕获并交给相应的驱动程序。一般在分析网络数据作为网络故障诊断手段时用到,同时这个模式也被网络黑客利用来作为网络数据窃听的入口。

BPF

Berkeley Packet Filter,缩写BPF,是类Unix系统上数据链路层的一种接口,提供原始链路层封包的收发。BPF支持“过滤”封包,这样BPF会只把“感兴趣”的封包到上层软件,可以避免从操作系统内核向用户态复制其他封包,降低抓包的CPU的负担以及所需的缓冲区空间,从而减少丢包率。BPF的过滤功能是以BPF虚拟机机器语言的解释器的形式实现的,这种语言的程序可以抓取封包数据,对封包中的数据采取算术操作,并将结果与常量或封包中的数据或结果中的测试位比较,根据比较的结果决定接受还是拒绝封包。

BPF Overview

Go Packet

Find Devices

1
2
3
4
5
6
7
8
9
10
11
12
13
14
15
16
17
18
19
20
21
22
23
24
25
26
27
28
29
30
31
32
33
34
35
36
package main

import (
"fmt"
"log"
"github.com/google/gopacket"
"github.com/google/gopacket/layers"
"github.com/google/gopacket/pcap"
)

func main() {
fmt.Println("----------Find all devices---------\n ")

devices, err := pcap.FindAllDevs()
if err != nil {
log.Fatal(err)
}
// Print device information
for _, device := range devices {
for _, address := range device.Addresses {
fmt.Println("- IP address: ", address.IP)
fmt.Println("- Subnet mask: ", address.Netmask)
}
}
/*- IP address: 45.33.110.101
- Subnet mask: ffffff00
- IP address: 2600:3c01::f03c:91ff:fee5:45b6
- Subnet mask: ffffffffffffffff0000000000000000
- IP address: fe80::f03c:91ff:fee5:45b6
- Subnet mask: ffffffffffffffff0000000000000000
- IP address: 127.0.0.1
- Subnet mask: ff000000
- IP address: ::1
- Subnet mask: ffffffffffffffffffffffffffffffff
*/
}

Decoding Packet Layers

1
2
3
4
5
6
7
8
9
10
11
12
13
14
15
16
17
18
19
20
21
22
23
24
25
26
27
28
29
30
31
32
33
34
35
36
37
38
39
40
41
42
43
44
45
46
47
48
49
50
51
52
package main

import (
"fmt"
"log"
"net"
"github.com/google/gopacket"
"github.com/google/gopacket/layers"
"github.com/google/gopacket/pcap"
)

func main(){

handle, err := pcap.OpenLive("eth0", 65536, true, pcap.BlockForever)
if err != nil {
fmt.Printf("Error: %s\n", err)
return
}
defer handle.Close()

//Create a new PacketDataSource
src := gopacket.NewPacketSource(handle, layers.LayerTypeEthernet)
//Packets returns a channel of packets
in := src.Packets()

for {
var packet gopacket.Packet
select {
//case <-stop:
//return
case packet = <-in:
arpLayer := packet.Layer(layers.LayerTypeARP)
if arpLayer == nil {
continue
}
arp := arpLayer.(*layers.ARP)

if net.HardwareAddr(arp.SourceHwAddress).String() == "abc" {
//Do something or don't
}

tcpLayer := packet.Layer(layers.LayerTypeTCP)
if tcpLayer == nil {
continue
}
tcp := tcpLayer.(*layers.TCP)

......

}
}
}

Creating and Sending Packets

1
2
3
4
5
6
7
8
9
10
11
12
13
14
15
16
17
18
19
20
21
22
23
24
25
26
27
28
29
30
31
32
33
34
35
36
37
38
39
40
41
42
43
44
45
46
47
48
49
50
51
52
53
54
55
56
57
58
59
60
61
62
63
64
65
66
67
68
69
70
71
72
73
74
75
package main

import (
"github.com/google/gopacket"
"github.com/google/gopacket/layers"
"github.com/google/gopacket/pcap"
"log"
"net"
"time"
)

var (
device string = "eth0"
snapshot_len int32 = 1024
promiscuous bool = false
err error
timeout time.Duration = 30 * time.Second
handle *pcap.Handle
buffer gopacket.SerializeBuffer
options gopacket.SerializeOptions
)

func main() {
// Open device
handle, err = pcap.OpenLive(device, snapshot_len, promiscuous, timeout)
if err != nil {log.Fatal(err) }
defer handle.Close()

// Send raw bytes over wire
rawBytes := []byte{10, 20, 30}
err = handle.WritePacketData(rawBytes)
if err != nil {
log.Fatal(err)
}

// Create a properly formed packet, just with
// empty details. Should fill out MAC addresses,
// IP addresses, etc.
buffer = gopacket.NewSerializeBuffer()
gopacket.SerializeLayers(buffer, options,
&layers.Ethernet{},
&layers.IPv4{},
&layers.TCP{},
gopacket.Payload(rawBytes),
)
outgoingPacket := buffer.Bytes()
// Send our packet
err = handle.WritePacketData(outgoingPacket)
if err != nil {
log.Fatal(err)
}

// This time lets fill out some information
ipLayer := &layers.IPv4{
SrcIP: net.IP{127, 0, 0, 1},
DstIP: net.IP{8, 8, 8, 8},
}
ethernetLayer := &layers.Ethernet{
SrcMAC: net.HardwareAddr{0xFF, 0xAA, 0xFA, 0xAA, 0xFF, 0xAA},
DstMAC: net.HardwareAddr{0xBD, 0xBD, 0xBD, 0xBD, 0xBD, 0xBD},
}
tcpLayer := &layers.TCP{
SrcPort: layers.TCPPort(4321),
DstPort: layers.TCPPort(80),
}
// And create the packet with the layers
buffer = gopacket.NewSerializeBuffer()
gopacket.SerializeLayers(buffer, options,
ethernetLayer,
ipLayer,
tcpLayer,
gopacket.Payload(rawBytes),
)
outgoingPacket = buffer.Bytes()
}

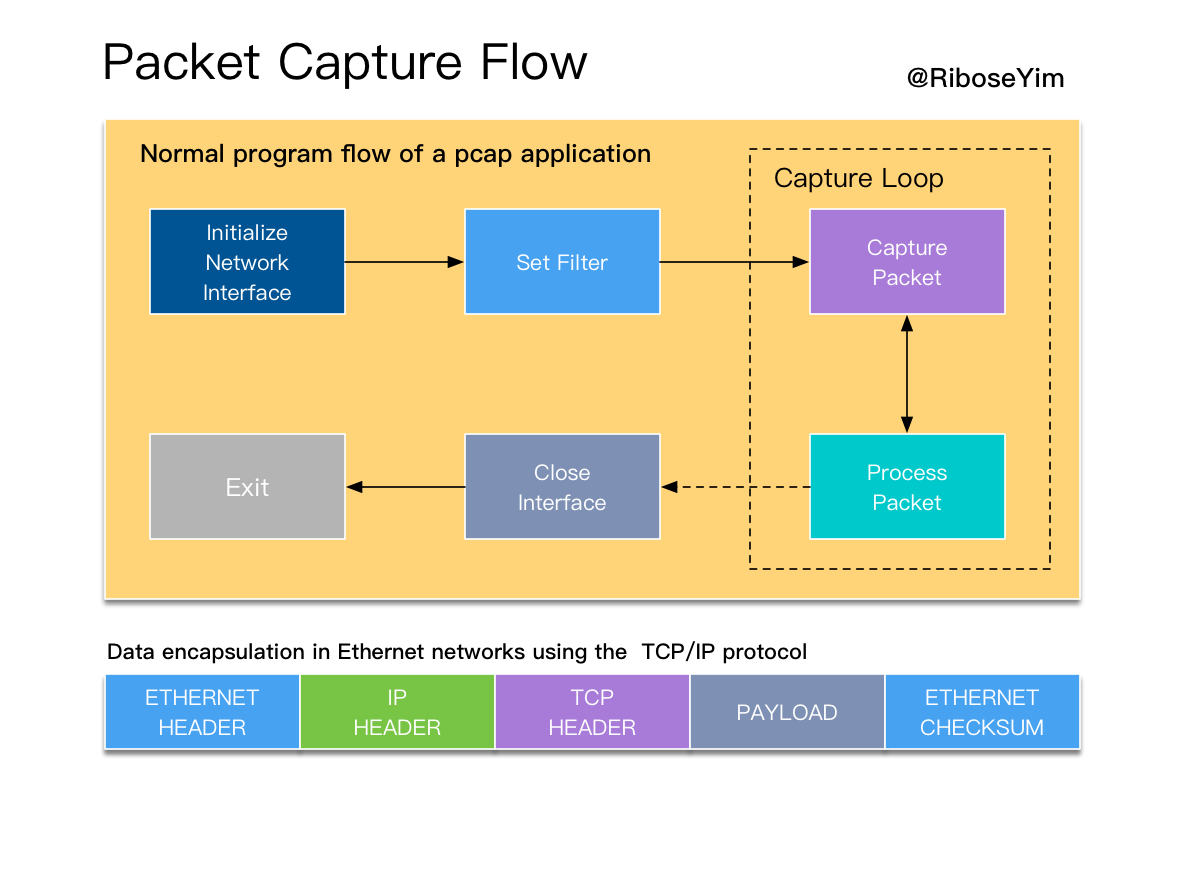
Capture Packet Workflow

  • Getting a list of network devices
  • Capturing packets from a network device
  • Analyzing packet layers
  • Using Berkeley Packet Filters

Demo & Repository

Application

拓展话题:SDN 网络中的可视化与数据封包

  • DPDK(Data Plane Development Kit)
    运行于Intel X86平台,是 Intel 开源的一组快速处理数据包的开发平台及接口(BSD)。重载了网卡驱动,该驱动在收到数据包后不中断通知CPU,而是将数据包通过零拷贝技术存入内存,这时应用层程序就可以通过DPDK提供的接口,直接从内存读取数据包。这种处理方式节省了CPU中断时间、内存拷贝时间,并向应用层提供了简单易行且高效的数据包处理方式,使得网络应用的开发更加方便。

专题合辑:Network Engineering

参考文献

推荐文章